Czech Master Resins 1/72 Seafire Mk XV (Frame Hook version)By Tom Gloeckle |
 |
The Kit
This is my first article for Internet Modeler, and coincidentally, my first resin aircraft kit.
As an unashamed anglophile and Spitfire/Seafire fanatic what better model to be a first resin project. The kit is molded in the usual honey colored resin, with detail that is every bit as good as any current injection molded kit. I was very surprised at how thin the castings were for the fuselage, thinner than some injection molded kits. This is both a good and bad thing. Bad because the parts would be prone to warpage but good because thats less weight on the fragile resin landing gear. The only non-resin bits are the two-vacform canopies provided. The instructions are quite good with exploded views of the construction process, and three view scale drawings. Color schemes for three Seafire provided on the decal sheet, and detailed stencil placement diagrams.
Construction
Construction begins with washing all the parts carefully so none of the very small parts are lost. I used warm soapy water; this gets rid of whatever mold release may be left on the kit. Instead of removing the entire mold blocks at once, I removed the parts as needed.
 I
also put the parts in separate small resealable snack bags according to
function, i.e. landing gear, flying surfaces. I want to make mention now
that I primed all the parts with Tamiya Fine White Primer. This is in
aerosol form, and lays down a very smooth workable base. I highly recommend
this product as a finishing versus filling primer.
I
also put the parts in separate small resealable snack bags according to
function, i.e. landing gear, flying surfaces. I want to make mention now
that I primed all the parts with Tamiya Fine White Primer. This is in
aerosol form, and lays down a very smooth workable base. I highly recommend
this product as a finishing versus filling primer.
I started with the cockpit, which has very nice sidewall detail, and is very complete. Fitting the instrument bulkhead was a bit of a finicky affair and required some dry fitting. Also, getting the rudder pedals to fit under the instrument panel was a bit of trial and error. I also added a set of Eduard photo etched harnesses for a finishing touch. I deviated from the instructions as they recommended the cockpit be painted black. I thought quite awhile on this one, checked my references, and came to the conclusion that being so close to the end of the war that it should be interior green. Now if anybody has a more definitive answer to this question, let me know.
The fuselage halves needed a little work with warm water to eliminate a little warpage around the waist near the tail. I also got a little rambunctious with the razor saw when removing the mold blocks. I ended up sawing a small chunk of the fuselage with the blocks. I managed to patch it with a blob of Miliput. Fit of the parts was quite good with only a minimum of filling. Testors red putty was particularly good for patching, it reacted quite well with the resin.
 The
wings are a single piece unit and fitted quite well to the fuselage. Though
I found the area near the oil cooler intake was not so good and very difficult
to correct. I also drilled out the machine gun ports for a more defined
representation. I didnt care for the rather poorly molded cannon stubs.
These were quite out of round, so I cut them off, drilled out the area,
and added aluminum tubing. At the same time, I cut off the mounting stubs
on the barrels and replaced them with fine wire. This provided a stronger
more positive mounting. I didnt want to keep knocking off the guns. Next
I added the horizontal stabilizers and the tail wheel doors. The doors
were added then to prevent their being knocked off later. I then added
the radiators and the tail hook in the retracted position. Once again,
the fit the parts were quite acceptable. So far, this has been quite fun.
The trickiest part up until now is the propeller. The spinner is molded
as a single unit, and the blades are separate units. The tricky bit is,
of course, getting the pitch right and everything at right angles. You
really miss locating pins for this bit.
The
wings are a single piece unit and fitted quite well to the fuselage. Though
I found the area near the oil cooler intake was not so good and very difficult
to correct. I also drilled out the machine gun ports for a more defined
representation. I didnt care for the rather poorly molded cannon stubs.
These were quite out of round, so I cut them off, drilled out the area,
and added aluminum tubing. At the same time, I cut off the mounting stubs
on the barrels and replaced them with fine wire. This provided a stronger
more positive mounting. I didnt want to keep knocking off the guns. Next
I added the horizontal stabilizers and the tail wheel doors. The doors
were added then to prevent their being knocked off later. I then added
the radiators and the tail hook in the retracted position. Once again,
the fit the parts were quite acceptable. So far, this has been quite fun.
The trickiest part up until now is the propeller. The spinner is molded
as a single unit, and the blades are separate units. The tricky bit is,
of course, getting the pitch right and everything at right angles. You
really miss locating pins for this bit.
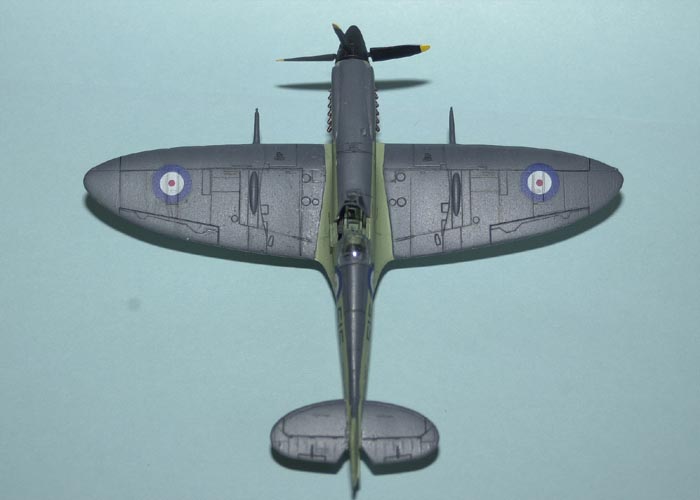
I was at the point where painting would begin. I filled the cockpit aperture with wet Kleenex and held the exit door in place with a little blob of poster tack. The model was sprayed with Tamiya primer, then with a combination of Tamiya and Polly Scale acrylics. I used Tamiya sky and Polly Scale extra dark sea gray. I then went over the panel lines with a diluted mix of Tamiya smoke and water on the sky and Polly Scale grimy black and water over the sea gray. The model was then coated with Future in preparation for the decals.
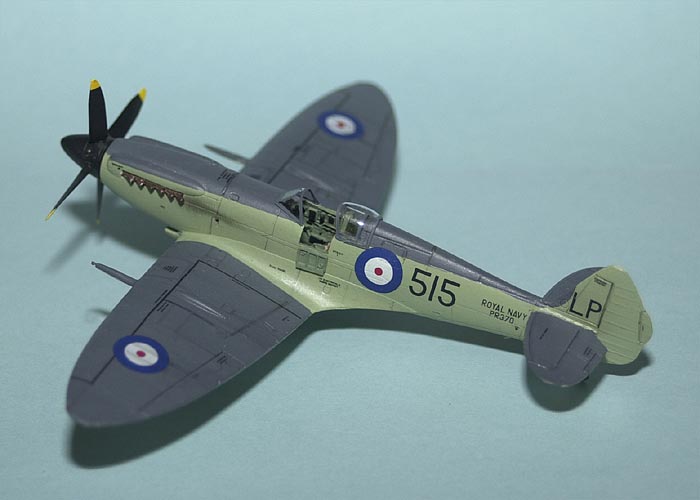
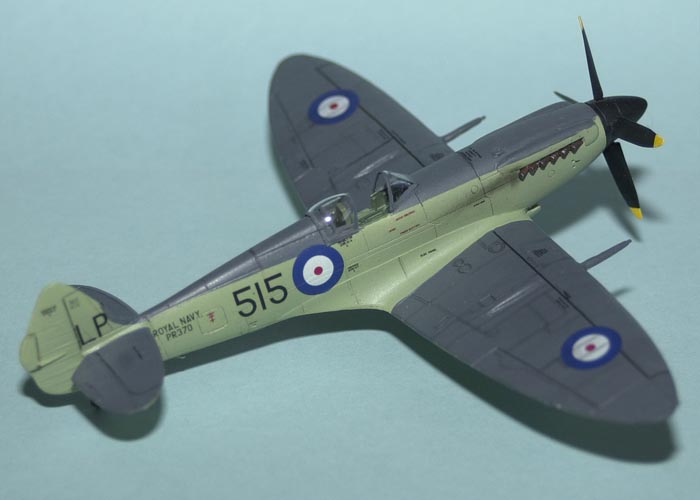
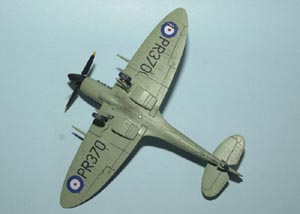
There are three decal options. Seafire PR362: 5H of 806 Squadron aboard HMS Glory, this is a standard late war sea gray, slate gray, and sky scheme. A post war sea gray and sky scheme for PR370: 515-LP of 773 Squadron on Gibraltar in 1950, the one I chose. The final choice is another sea gray/sky scheme, this one with the French Navy, SR520: 1F.23 of Flottille 1F in 1950. The decals are very thin and react well to Sol and Set, however, the various walk lines and warning lines tended to be very fragile. I also found the 50 plus bits of stenciling very tedious, but they sure add a neat touch to the finished model. After the decals had set the model was shot with Testors Acryl flat coat.
The final part of construction was the landing gear, and the wire cage for the tail wheel.
 The
main gear is nicely molded with separate scissors that, on my kit, either
broke or were poorly molded. I left them off and will probably replace
them with a photo-etched pair at a later date. The main wheels have nice
wheel detail, though I think the tires are a bit too flat. I once again
cut off the mounting stubs for the main gear and replaced them with piano
wire. This is, again, much more secure and strong. The tail wheel is molded
in one piece, and when attached, I thought made the tail sit too high.
When compared to drawings it seems just fine, though Im not sure about
that one. I replaced the kit-supplied canopies with one from Falcon. The
canopy is part of a Spitfire special set, and is molded in three parts.
This made for a better-looking open canopy. I dont know what those folks
at Falcon use for their parts, but they react very nicely to plain old
white glue.
The
main gear is nicely molded with separate scissors that, on my kit, either
broke or were poorly molded. I left them off and will probably replace
them with a photo-etched pair at a later date. The main wheels have nice
wheel detail, though I think the tires are a bit too flat. I once again
cut off the mounting stubs for the main gear and replaced them with piano
wire. This is, again, much more secure and strong. The tail wheel is molded
in one piece, and when attached, I thought made the tail sit too high.
When compared to drawings it seems just fine, though Im not sure about
that one. I replaced the kit-supplied canopies with one from Falcon. The
canopy is part of a Spitfire special set, and is molded in three parts.
This made for a better-looking open canopy. I dont know what those folks
at Falcon use for their parts, but they react very nicely to plain old
white glue.

The last bit of the kit that had me really thinking was the wire cage. I thought about using stretched sprue, but gave that up as too fragile. Then settled on .015 piano wire, which might be a bit out of scale, but it is a compromise. Czech Master does provide a pattern for at least measurements for the cage, which eliminates guess work. After five grueling tries, the cage is in place. It doesnt look too great, but deadlines precluded a better attempt.
Conclusion
This is a very nice model, crisply molded and fits very well. I think this makes an excellent first resin kit as it isnt too complex, nor frustrating. I checked it against my available references and seem a bit short in the fuselage, though right on in wingspan. It does look every bit the late Griffon powered Seafire its meant to be. Kudos to Czech Master and a big thank you to Chris for providing me with the kit. I look forward to other Czech Master releases.

![]()


