
Hasegawa 1/72 A-10C "Flying Razorbacks"
By Anna Leas
A fellow member of my IPMS chapter asked me if I was interested in doing a build review for our club. Delighted by the trust shown to me by a senior member I jumped at the opportunity!
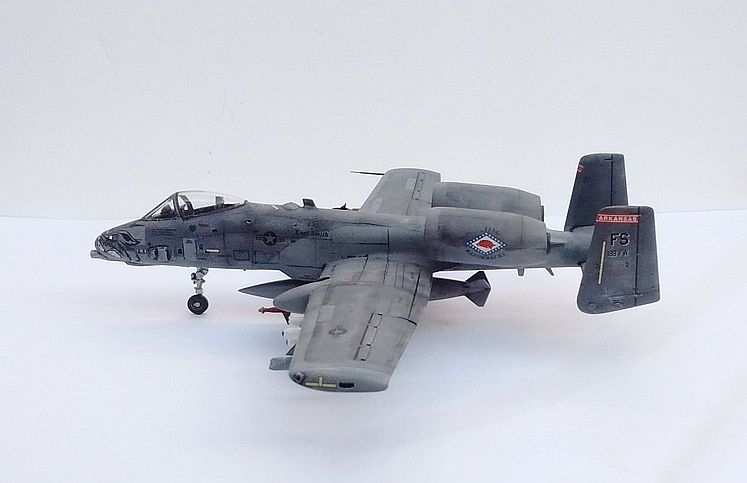
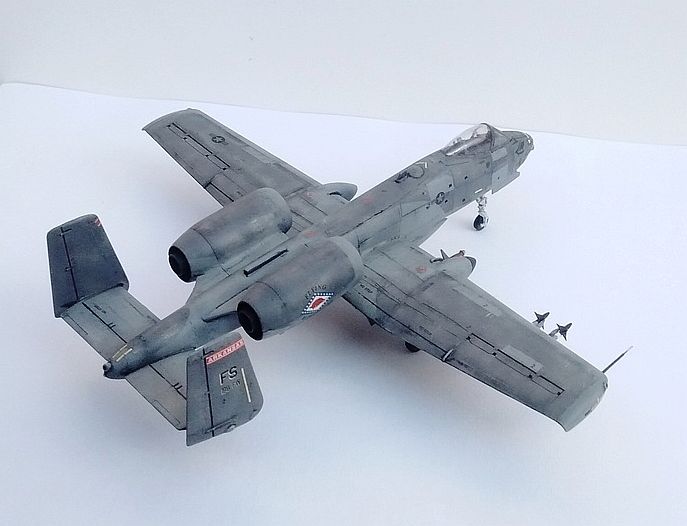
Initial impressions verified that this boxing was indeed an older kit with a snazzy new decal sheet with plenty of stenciling and two interesting choices of nose-art markings-- the titular razorback hog's head from Arkansas, and an angry snake's head for the Blacksnake ANG squadron out of Indiana. I chose the Razorback markings, and set the Blacksnake decals in the spares for use on a later kit.
The pale-grey plastic is molded crisply, with few areas of flash. The most noticeable details are the raised panel lines. If you're fussy about this sort of thing, then this might not be the kit for you. Ten sprues are packed in the box, with the clear sprue let loose among all the others. I would have preferred that the clear parts be in their own little baggie to protect against scratches, but luckily my canopy pieces were blemish-free. Also included in the sprues is a full compliment of ordinance, thankfully sparing the modeler from having to seek out a weapons set. (Editor's note: check out the First Look to see the contents of the box.)
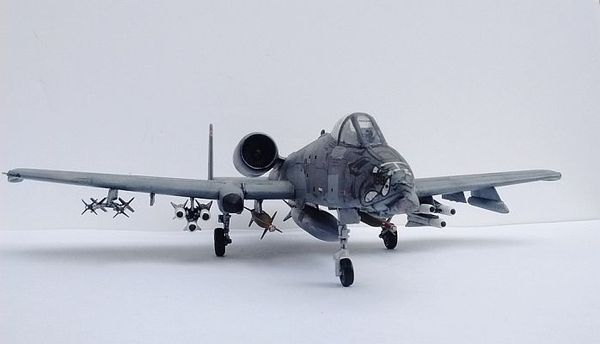
Ordinance supplied include a pair of bomb racks with the dozen corresponding (500lb?) bombs, three 600 gallon ferry tanks, six maverick missiles and their pair of TER's, a pair of AIM-9 Sidewinder missiles, and four 1000lb UGB's. While flash-free, the weapons all had fairly large ejector marks that needed to be cleaned. Please note that many current A-10's no longer carry the Pave Penny pod, but are instead equipped with a LITENING pod on one of the wing pylons. This is not included in the kit, leaving the targeting pod as the only armament I had to source.
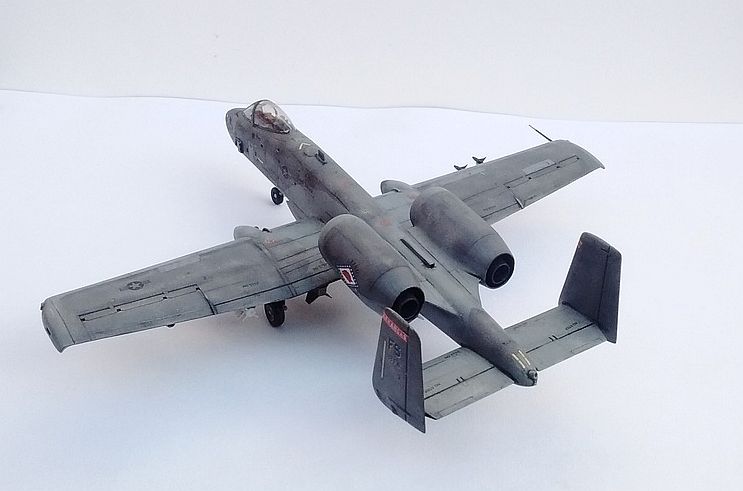
Moving on to the build, construction starts not at the cockpit, but with the engine pods. This was easily completed using the exploded-view diagrams, and the little exhaust tubes have some nice detail hidden away for those sharp-eyed observers. The second step took me to the wing assembly, where Hasegawa designed the wing with a seam line that runs all along the underside of the ailerons and flaps! That means you have to fill and sand for a smooth, seamless surface.
The cockpit pieces are simplified and bare, with decals providing all the instrument details. The instrument panel decal and corresponding "blank" plastic piece do represent the newer glass cockpits installed on current A-10's. Research assured me that the greatest differences between the -A and -C models are upgraded avionics and sensors. So while the IP does represent the correct -C cockpit, some sensors are missing from the fuselage; most noticeably the "bug eye" antennas on the nose. It was asked that I build this kit out-of-the-box, but the basic ejection seat was...basic. A bit of tape seat belts helped to spruce things up a bit.
The instructions show that 10g of ballast will be required on the nose. As I have no gram scale, I quickly taped the 'Hog together to make sure I got the nose weight correct. It appeared that four of my split-shot sinkers would be enough to balance the model, but I added a fifth to be sure. No tail-sitting here!!
I don't know if it was the fishing weights I added, a warp in the parts, or a fit issue inherent in the kit, but assembling the front of the fuselage was a bit awkward. Four pieces come together in this step - the left and right fuselage halves, the front gear bay, and the round nose - and misaligning any one of these will throw off the fit of the others. This required me to clamp and glue in sections in an attempt to get the best alignment. Despite my best efforts, steps between the parts required putty and sanding.
As I had decided on a closed canopy build, I went to secure the clear pieces in place to help protect the cockpit details from sanding dust. It was at this point I discovered that the ejection seat was too tall to fit under the canopy! I popped it out and sanded off a bit from the seats' base, test fitting often to determine the needed height (or lack thereof...).
Along with a closed canopy, I also opted not to display the boarding ladder. But the piece for the open door did not fit into it's matching recess. Trimming this piece was required to get it to fit, and I puttied any of the resulting gaps. When slotted into place, the wing assembly showed a thin gap along the wing root, which also received putty. Due to all the sanding I had done, much of the raised details were lost. Diagrams found on the web helped me mark where the correct panel lines were to go, and I spent an afternoon re-scribing the kit.
Once I was content with my sanding and rescribing, I went attached the landing gear to allow the model to stand free during painting. The gear bay details are almost non-existent, as are any attachment points. The legs were merely attached with a simple "butt-join" that would snap apart multiple times before the model was finished.
I caught a few hours here and there between family visits and holiday parties (mostly later at night!) to work on the kit a bit more. I smoothed down the areas that needed touchups, and sprayed another coat of my usual black enamel primer to make sure all the seams were satisfactory. Then, I preshaded with white MM Acrylics to give a mottled base for the subsequent grey paint.
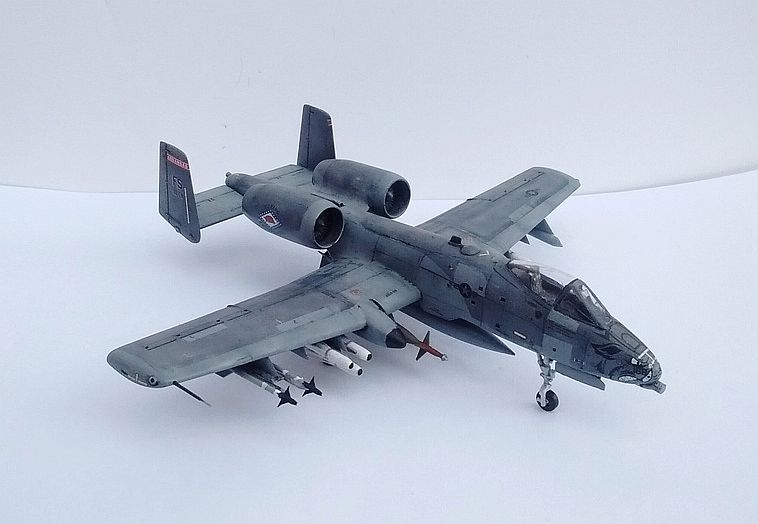
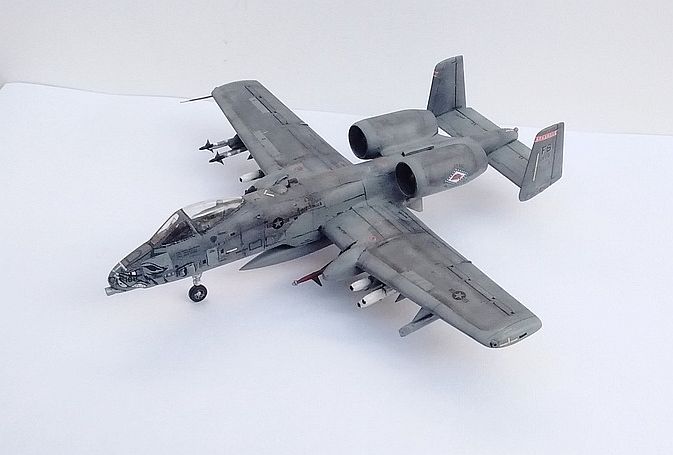
I'm thinking a combo of the yellow work light and a sleepy builder resulted in a warthog that a bit...darker...and blue-er?...than it should have been. Whoopsies! Still, I liked the fading effect I achieved and decided to push on. I picked out a few select panels in a third shade of grey to help show a well-used and patched up warthog. I brush painted a gloss coat of Future, (Pledge Multicare Floor Polish, or whatever it's called now...) to get ready for decals.
Once the Future had cured, I began with the tricky hog-head decal. The nose art was spread between four decals and patience was required to get all of them to snuggle down onto the complex curves of the nose. Eventually I aligned all the nose decals properly, with only a few areas needing to be sliced. The remaining markings were not difficult to apply, but some stencils did show silvering despite my efforts. The decals were sealed with another coat of Future and once cured, I applied my mix of india ink and brown watercolor for the panel line wash. A quick spray of Testors Flat Lacquer helped blend the paint and weathering effects together, and well as deaden the glossy sheen of the Future coats.

I had assembled the ordinance in-between previous steps and selected a payload of one centerline fuel tank, two big UGB's, the two Maverick TER's, and the sidewinder pair. I crafted a simple LITENING pod from a spare bit of sprue. Once all the weaponry was glued into place, a heavier coat of Flat Lacquer insured that any remaining gloss sheen or glue spots were hidden. I unmasked the canopy, reattached the legs, and called her DONE!
In summary, this is a re-boxing of an older Hasegawa kit with new decals included - but an old simplified kit with fancy decals does not warrant the price tag I have seen asked. The cockpit is only detailed by flat decals, which is OK for a closed canopy build. Those seeking further details would best opt for an aftermarket replacement. The basic details and iffy fit issues subtract from the kit, but the boxing is lifted up due to a nice supply of ordinance and interesting nose art.
7 out of 10
Our thanks to Hasegawa USA for supplying the review kit.